Using the Electric Vehicle menu (Type2)
You can use various EV-specific functions, such as driving and energy information views and vehicle charge scheduling.
On the All Menus screen, press EV.
- The screen may differ depending on the vehicle model and specifications.
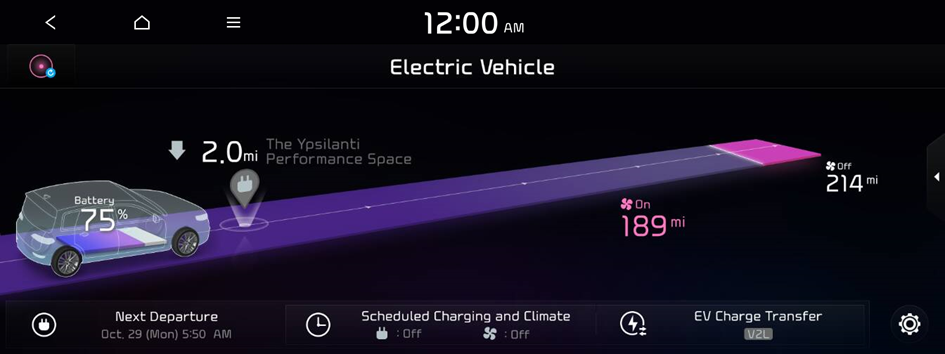
Electric Vehicle screen (EV only)
The Electric Vehicle screen provides the following features and information:
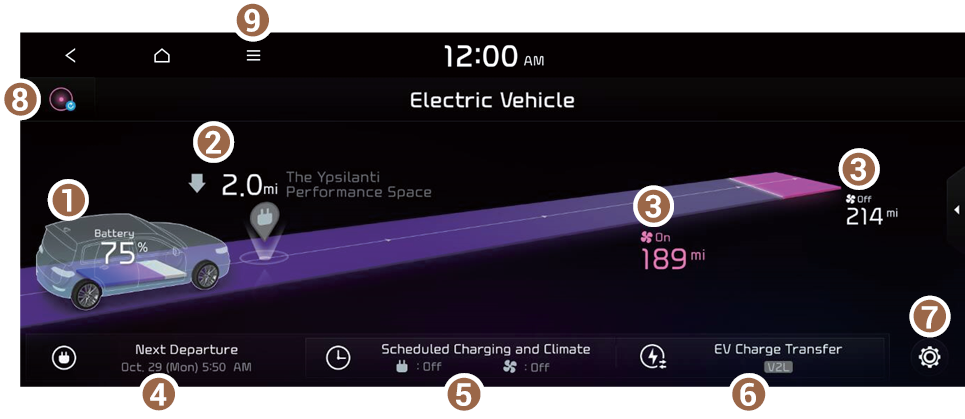
- View the current battery level.
- If you press the vehicle image, the energy information screen appears.
- Can search for nearby charging stations.
- The details of charging stations displayed on the map screen may not match the actual information.
- View the distance to empty for the current climate control settings.
- The details of drivable range displayed on the map screen may not match the actual information.
- Set the next departure time. ▶ See "Setting the next departure time."
- Configure settings to perform charging and/or climate control according to the departure time. ▶ See "Scheduling a charge and climate controls."
- Set an electricity usage limit. ▶ See "Setting an electricity usage limit (if equipped)."
- • V2L: This technology uses the battery power of an electric vehicle to power electronic devices in the vehicle.
- You can set to enable the Electric Vehicle mode. ▶ See "Configuring the EV settings."
- Move to the EV Range screen.
- The list of menu items appears.
- • Display Off: Turns off the screen. To switch the screen back on, press the screen or briefly press the power button.
- • Energy Information: You can view the drivable range, expected time required to complete charging, fuel efficiency graph and power consumption. ▶ See "Viewing the battery status/electricity use/EV economy history."
- • Charging Station List: Can search for nearby charging stations. ▶ See "Searching for nearby charging stations."
- • EV Settings: You can set to enable the Electric Vehicle mode. ▶ See "Configuring the EV settings."
- • User's Manual on Web (QR Code): Displays the QR code that provides access to the online user manual for the system.
- • Split Screen: Can turn on or off the split screen mode.
Using the maximum power output mode (if equipped)
This feature controls the battery temperature to ensure the maximum power output. Using this feature may decrease the driving range of the vehicle.
Turn on split screen mode, and press Maximum Power Output Mode.
- Maximum power output mode is activated only when the battery SoC is more than 70%.
- Maximum power output mode is turned off if the battery SoC is low or the connection to the vehicle system is poor.
Viewing the drivable range
Can check the drivable range under the remaining battery amount.
- The details of drivable range displayed on the map screen may not match the actual information.
- On the map screen, press
 ▶ EV Range.
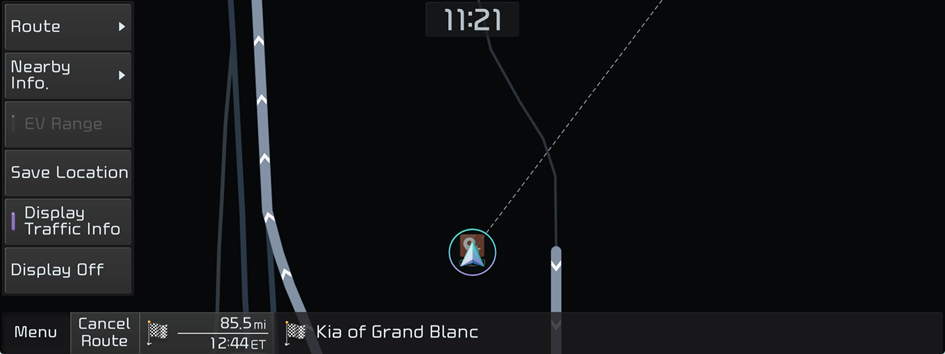
- On the EV Range screen, check the drivable distance and nearby charging stations.
The drivable range is distinguished by a blue circle. Using the icons within the drivable range, you can check the locations and availabilities of charging stations.
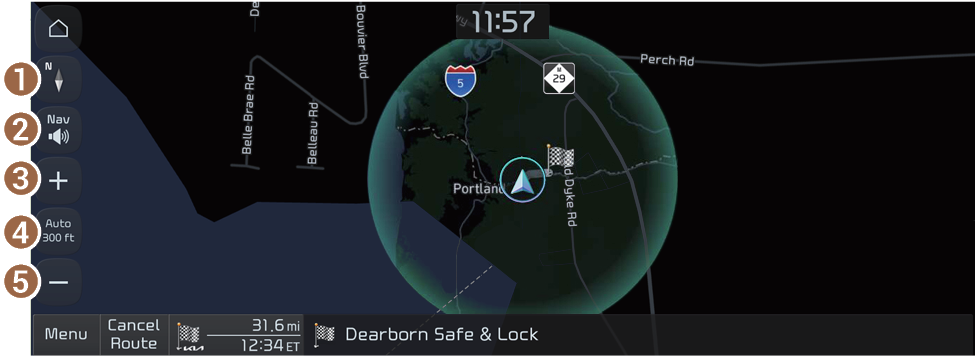
- Used to change the map display mode.
- •
 (North Up 2D): Displays the map with the north fixed at the top.
 - •
 (Heading Up 2D): Rotates the map depending on the travel direction.
 - •
 (Heading Up 3D): Rotates the map depending on the travel direction for 3D view (if equipped).
- •
- You can adjust the volume of navigation or GPS warning sound (if equipped).
- Zooms in the map.
- The scale of the map automatically changes (if equipped).
- Zooms out the map.
- Used to change the map display mode.
Searching for nearby charging stations
When you want to drive beyond the drivable range, you can search for charging stations within the range and start route guidance to a selected charging station.
- On the All Menus screen, press Navigation Menu ▶ Nearby POIs ▶ EV Charging Stations to search for nearby charging stations.
- Select the region to search on the left of the screen and then select the desired charging station on the right.
- To see the desired charging station, press
 and then select the charging type and brand.
 - To set a charging stations as a favorite, press
 to the right of its name. When a frequently visiting place is set as a favorite, you can easily search the location from the Favorite Stations menu.
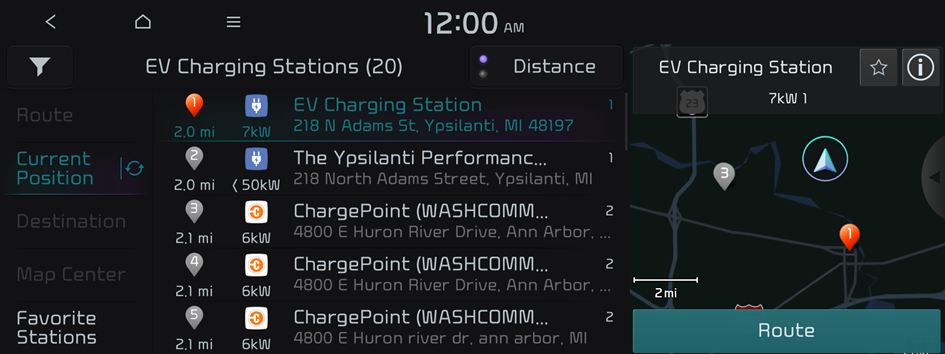
- To see the desired charging station, press
- Check the location of the destination and then press Route.
- When there are previous destinations, press Change Destination ▶ Yes.
- Depending on the third-party service provider, basic information or status information on some charging stations may differ.
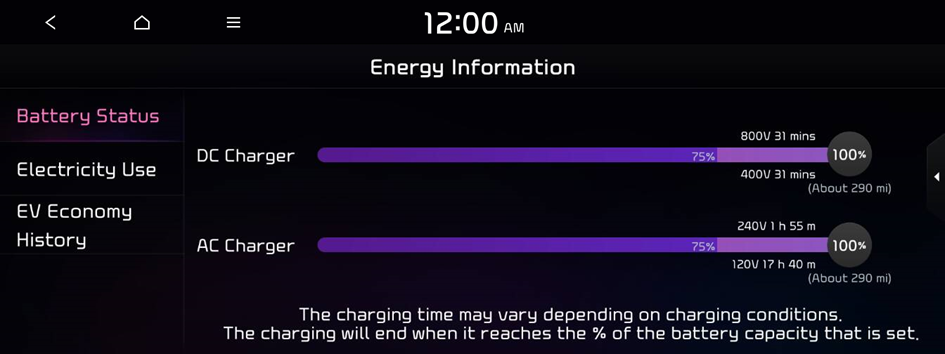
Viewing the battery status/electricity use/EV economy history
You can view the drivable range, expected time required to complete charging, fuel efficiency graph and power consumption.
- Press the vehicle image on the Electric Vehicle screen.
- From the energy information screen, select an item to view the item information.
- To access the online user's manual on the Energy information screen, press
 ▶ User's Manual on Web (QR Code) and scan the QR code.
- To access the online user's manual on the Energy information screen, press
Viewing the Battery Status
You can see the drivable distance and the estimated charging time.
On the Energy information screen, press Battery Status.
- With the AC/DC charger, you can see the charging time to the target battery amount and the estimated drivable distance when fully charged. To set a target battery level, drag the control bar.
- The details of drivable range displayed on the map screen may not match the actual information.
- When accessing the energy information screen during charging or power transmission, the displayed screen is different depending on the charging / power transmission status.
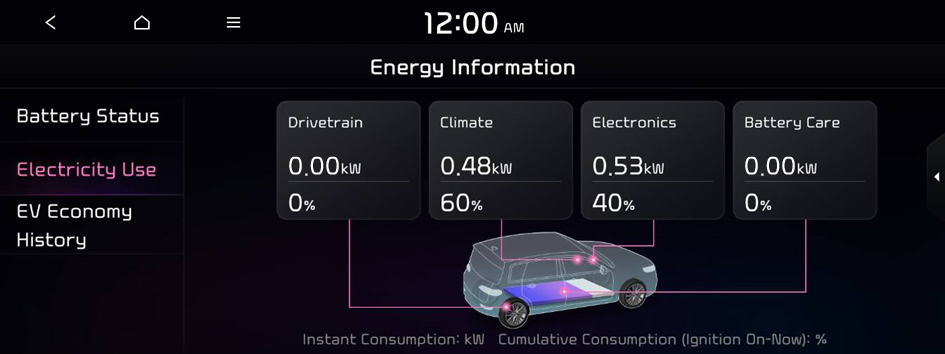
Viewing the Electricity Use
You can view the power consumed by the drivetrain, climate control, electrical systems and battery care function.
On the Energy information screen, press Electricity Use.
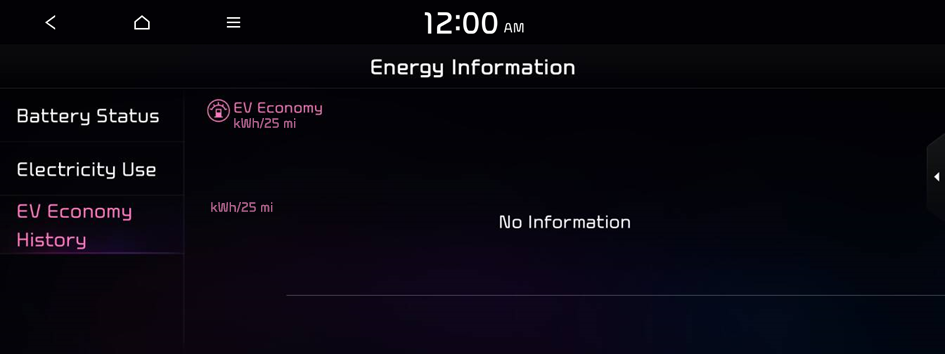
Viewing the EV Economy History
You can view a graph of fuel efficiencies on individual dates.
On the Energy information screen, press EV Economy History.
Setting the next departure time
Set the next departure time.
- On the Electric Vehicle screen, press Next Departure.
- Select the departure time and then press
 for the item.
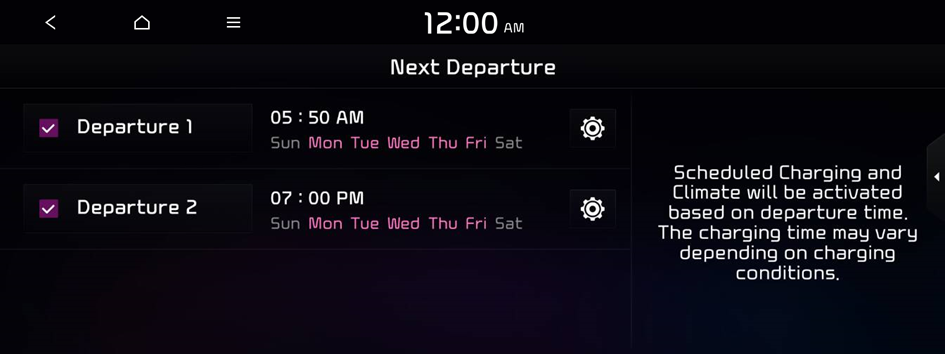
- To access the online user's manual on the Next Departure screen, press ▶ User's Manual on Web (QR Code) and scan the QR code.
- To access the online user's manual on the Next Departure screen, press
- Set the time and day and then press OK.
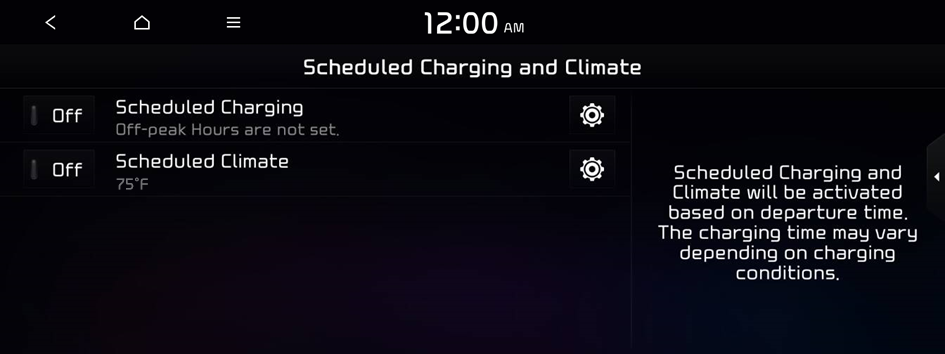
Scheduling a charge and climate controls
You can configure various functions such as automatic battery charging or climate control according to the specified departure time.
- On the Electric Vehicle screen, press Scheduled Charging and Climate.
- Select and then change the settings.
- To access the online user's manual on the Scheduled Charging and Climate screen, press ▶ User's Manual on Web (QR Code) and scan the QR code.
- To access the online user's manual on the Scheduled Charging and Climate screen, press
Scheduling a charging
You can schedule the charging based on the departure time.
- On the Electric Vehicle screen, press Scheduled Charging and Climate.
- Select Scheduled Charging and press .
- Select and then change the settings.
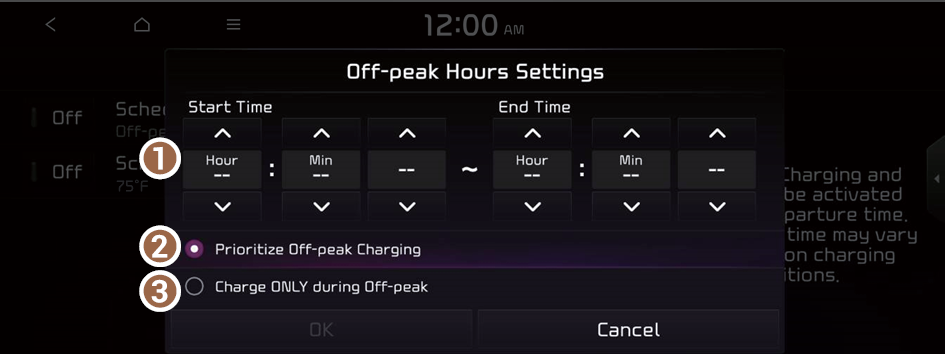
- You can set the off-peak electricity time.
- You can charge the battery for the next departure, primarily using off-peak hours to benefit from lower rates.
- You can charge the battery only during off-peak hours that offer a lower charging rate benefit.
- Press OK.
- Scheduled charging is performed only when the charging connector is connected to the vehicle.
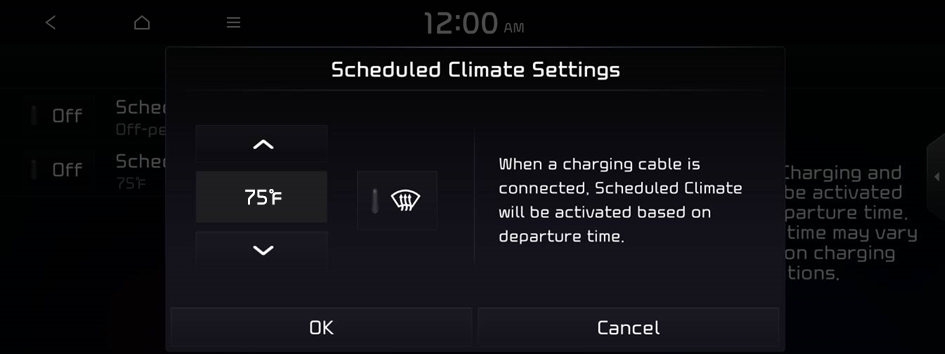
Scheduling climate controls
Configure settings to perform climate control at the next departure time.
- On the Electric Vehicle screen, press Scheduled Charging and Climate.
- Select Scheduled Climate and press .
- Set the desired temperature and auto defogging and then press OK.
Setting an electricity usage limit (if equipped)
Set an electricity usage limit.
- V2L is a technology that uses the battery power of an electric vehicle to power electronic devices in the vehicle.
- The electricity usage settings function is turned on when an electronic device is connected.
- On the Electric Vehicle screen, press EV Charge Transfer.
- Set the minimum battery level.
The battery power is consumed, with the exception of the power equivalent to the minimum battery level.
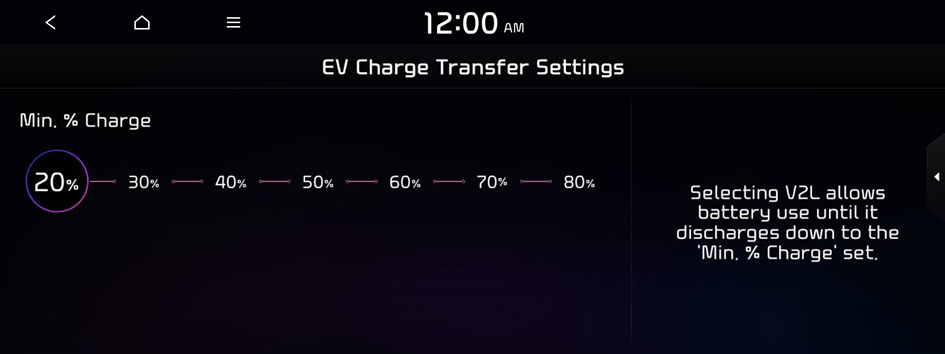
- When an electricity usage limit is set, you cannot go below the minimum battery level when using power.
- To access the online user's manual on the EV Charge Transfer Settings screen, press ▶ User's Manual on Web (QR Code) and scan the QR code.
Configuring the EV settings
You can set convenience features available for electric vehicles.
- On the Electric Vehicle screen, press .
- Select and then change the settings.
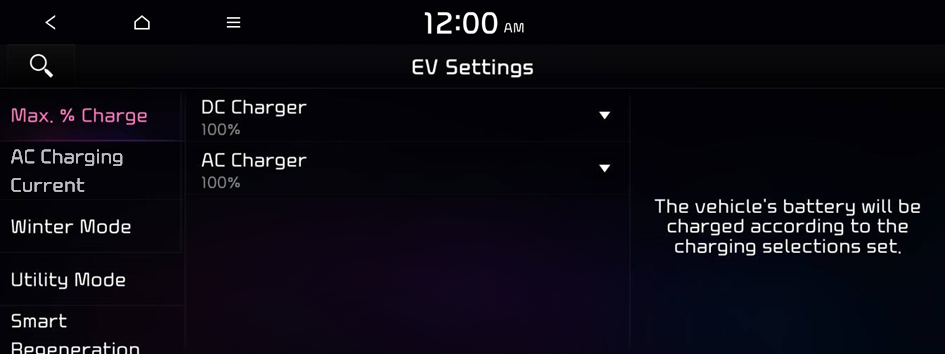
- Available options may differ depending on the vehicle model and specifications.
Max. % Charge
You can set the battery amount to charge.
- AC charging ensures the optimal battery performance for a long time compared to DC charging.
- When the battery amount reaches the target level, charging stops. When you charge only the required battery amount, it can ensure the optimal battery performance for a long time, compared to full battery charging.
AC Charging Current
You can set the charging current depending on the installed charger type.
- The charging time may vary depending on charging conditions.
- If a problem occurs during charging, lower the charging current and try again. If you lower the charging current, it may take longer to charge the battery.
Winter Mode (if equipped)
Can increase the battery temperature in advance to enhance the charging and driving performance when scheduling charge or climate controls in winter. This decreases the drivable distance because it causes to drain the battery faster.
Utility Mode
Turns on utility mode. When this function is on, electric systems on the vehicle are operated using the driving (high-voltage) battery.
- To turn off utility mode, press the Start button.
Smart Regeneration (if equipped)
Set to activate regenerative braking automatically based on the vehicle state or driving conditions.
Smart Regeneration System (if equipped)
Adjusts the deceleration strength during Smart Regeneration System.
Charging Connector Locking Mode (if equipped)
Configure the lock mode setting for the connected charging cable.
Charging Voice Prompts (if equipped)
Configure the settings so that voice information about charging status is provided as soon as charging begins.
Trailer Mode (if equipped)
Configure settings so that driving performance is maintained and the drivable range is estimated when a trailer is connected.
Plug & Charge (if equipped)
Vehicle authentication, charging, and payment are automatically processed when connected to a charging cable. The charging service can be used after registering as a member. Only available in Plug & Charge service areas.


