Setting Destinations for Navigation
Destination Search Screen
Press [Menu] > [Destination] on the map screen.
|
|
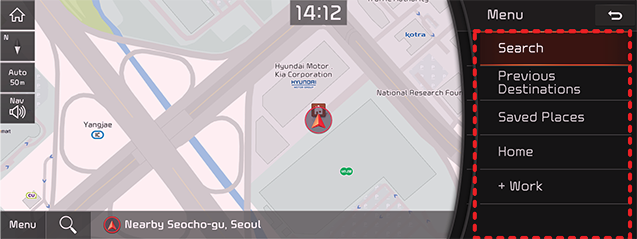
Search
The search results by the complete name or initial, phone number or address are specified on Map.
Previous Destination
A destination is searched by [Freq.Visited Points], [Destinations], [Searches].
Saved Places
Searches a destination registered in Address Book Menu.
Add Home/Home
- Save Home at the Address Book.
- Searches Registered Home as Destination.
Add Work/Work
- Save Work at the Address Book.
- Searches Registered Work as Destination.
Setting Destinations by Search
Sets a destination by entering the full name or initial, phone number or address.
- Press [Menu] > [Destination] > [Search] on the map screen.
|
|

- Press [OK] after entering the desired the name of destination.
|
|

- Select the desired item after pressing the desired location in the list.
|
|

- [Set as Destination]: Sets the destination.
- [Add Waypoint]: Adds waypoint after setting destination.
- [Save]: Adds frequently used address to the address book menu. Press [Menu] > [Destination] > [Saved Places] on the map screen to check the registered location.
- [Nearby Info.]: Sets to display the POI Category on the map screen.
- [Parking]: Displays the parking lot around the destination.
- [Call]: Makes a phone call. If no phone number is saved or Bluetooth is not connected, the call is not available.
- [Information]: Provides details about the currently selected location.
- [Display Off]: Turns off the screen.
- [Web Manual]: Displays the QR code for the manual of corresponding function.
- [Split Screen]: Displays split Screen Selection Menu.
- Press [Set as Destination].
|
|

- Press a desired route.
- Start guidance.
|
,Reference |
|
When the destination is not set, press [h] > [Search] at the bottom of the map screen to move to search screen. |
Setting Destinations by Previous Destinations
Sets the destination to the previous destination.
- Press [Menu] > [Destination] > [Previous Destinations] on the map screen.
|
|

- Press the desired location in the list.
- [Freq.Visited Points]: Shows frequently visited destinations.
- [Destinations]: Shows locations recently set as destinations.
- [Searches]: Shows recently searched locations.
- Reference Step 4-6 of "Setting Destinations by Search" for follow-up actions.
Setting Destinations by Address Book
Sets the location registered in the address book as the destination.
- Press [Menu] > [Destination] > [Saved Places] on the map screen.
|
|

- Press the desired location in the list.
- Reference Step 4-6 of "Setting Destinations by Search" for follow-up actions.
Setting Destination with Home/Work
Sets the location saved under Home/Work as the destination.
- Press [Menu] > [Destination] > [Home] or [Work] on the map screen.
|
|

- Reference Step 4-6 of "Setting Destinations by Search" for follow-up actions.
Setting Destinations by POI
Sets the destination through various facility categories.
- Press [Navigation Menu] > [Nearby POIs] on the home screen.
|
|

- Press a desired item.
|
|

- [Along Route]: Facility search in neighboring area of route.
- [Near Current Position]: Facility search in neighboring area of the current vehicle location.
- [Near Destination]: Facility search in neighboring area of destination or waypoint.
- [Near Center of Map]: Facility search in neighboring area of selected location.
- Select a desired list.
- Reference Step 4-6 of "Setting Destinations by Search" for follow-up actions.
Setting Destinations by Address Search
Destinations can be set easily through address searches in various forms.
Press [Navigation Menu] > [Others] > [Address] on Map Screen.
|
<Address Screen> |

- [New Address]: Sets the destination with the street address
- [Old Address]: Sets the destination with the location address
- [Dong Search]: Sets the destination via searching the village name.
- [Street Search]: Sets the destination via searching the street name.
Address Search by Street Name
- Press [New Address] on Address Screen.
|
|

- Press House No. > Street > City > State.
Page switch is available by using quick scroll Button at the right side. Press initials of the area name. (Press “S” for Seoul.)
- Press the building no. and [b].
|
,Reference |
|
- Reference Step 4-6 of "Setting Destinations by Search" for follow-up actions.
Search by Location Address
- Press [Old Address] on Address Screen.
|
|

- Press House No. > Street > City > State.
Page switch is available by using quick scroll Button at the right side. Press initials of the area name. (Press “S” for Seoul.)
- Press the building no. and [b].
|
,Reference |
|
- Reference Step 4-6 of "Setting Destinations by Search" for follow-up actions.
Search by Village
- Press [Dong Search] on Address Screen.
|
|

- Enter the village name and press [h].
- Select a desired list.
- Press the building no. and [b].
|
,Reference |
|
- Reference Step 4-6 of "Setting Destinations by Search" for follow-up actions.
Search by Street Name
- Press [Street Search] on Address Screen.
- Enter the street name and press [h].
- Select a desired list.
- Press the building no. and [b].
|
|

|
,Reference |
|
- Reference Step 4-6 of "Setting Destinations by Search" for follow-up actions.
Setting Destinations via Scroll
Sets a destination on the currently displayed map.
- Select a desired location or push touchpad to up/down/left/right on the map screen. The location is specified at the center of map.
|
|

- Press [Menu].
|
|

- Reference Step 4-6 of "Setting Destinations by Search" for follow-up actions.
|
,Reference |
|